How to use flash to supplement tungsten lighting?
I am writing this for keen amateur photographers who would like to take professional looking photos using a flash gun, or speedlight, indoors in a house that is lit with tungsten bulbs. I have “kept things simple”. Best I can.
Remember that the three dimensionality of the scene will be controlled by the shadows, just as much as by the light.
In my opinion there are three important things to consider;
- Getting your flash off the camera (ie “off camera flash”)
- Calculating the correct exposure
- Matching the colour balance of your flash to the ambie
- nt light from the tungsten lighting
Getting your flash off the camera
Why?
Because a photographer needs to control how the flash complements (or even compliments!) the ambient lighting in the room. Getting the flash off the camera allows you to point it in the direction you want, so you can control where the light falls, and how shadows are created on your model.
If you use a flash mounted on top of your camera, you have much less control over the spread of light. If you point the flash directly at your model, the lighting on him/her will be very flat and (probably) uninteresting. Alternatively you can bounce the flash off another surface, by pointing it’s head in that direction. Here you will be limited by the availability of suitable surfaces, and just how “suitable” they are! They may be coloured, and they may not be where you want them. More than likely, by the time the light bounces back to your model, it will have spread out and will no longer be “controlled”. As a compromise, if you don’t own a suitable light modifier available, you can get someone to hold a white card for your flash to bounce off.
Will I need to use a lighting modifier on my flash?
That depends on the effect you want. A bare speedlight is a very small light source, so it makes hard shadows. If you want softer shadows, then you need to use an appropriate modifier. I am not getting into different speedlight modifiers here, but have listed the modifers I used in this shoot below. One thing a bare speedlight is good for, is keeping the area the light hits very small.
How can I control my specific brand of flash gun?
It is not the scope of this article to explain how to control whatever brand of flash or speedlight you are using. You need a method to trigger the flash, and you will need to control the brightness of the flash. I am assuming you already know how to do these. If you don’t, you can find out in the relevant manuals, or finding online instructions.
How to calculate the correct exposure
If you are going to start using off camera flash often, I strongly recommend you invest in a light meter, because it will help enormously. If you don’t already have a light meter, you will have to adjust the brightness of your flash by trial and error. This isn’t so bad if you are only using one flash head, but it gets complicated if you are using several.
Experienced photographers already know what follows, but if it is new to you, it will indeed be very worth knowing!
You can consider a photograph that is taken using flash as a superposition of two independent exposures
One exposure is that due to the ambient light, and this exposure is controlled by the aperture and shutter speed (and whatever iso you are using).
The other exposure is due to the flash, and the shutter speed is irrelevant. This is because the shutter is open longer than the duration of the flash.
Caveat – If the shutter speed is too fast you may get an underexposed band down one side of your photo. Many cameras allow a shutter speed in the region of 1/250s when you use off camera flash in this manner, although much faster shutter speeds can be used if the flash gun is mounted on top of your camera. But I am not getting into that here.
Start by setting the exposure on your camera for the ambient light
The first thing I will decide is what aperture I want to use for the style of image I want to create. Usually this decision is made according to the depth of field I want (the larger the aperture, the shallower the depth of field). If this aperture obliges me to use an unrealistic shutter speed, I will adjust the iso appropriately, and maybe use a tripod (I often use a tripod anyway).
Most rooms have several sources of ambient light, and I will consider what lights to switch on, or even move, if appropriate. If there are windows and it is daytime, one can add light from the windows too, but I am not considering that now, because this blog is about matching flash to tungsten lights.
Should I use a light meter to decide how to expose for ambient lighting?
If the amount of light is fairly uniform in a room, I might measure it using a light meter.
But if the light is not uniform, I usually use my camera to help decide what exposure settings to use. That is to say, with my camera already set to the aperture (and iso) I have decided to use, I switch it to full manual control. Now I will take a few shots and adjust the shutter speed until the camera records the room the way I want it to appear in the final image. I use the image on the back of the camera, and the histogram, to guide me. In this particular scene, it was important to show that the standard light was on, but not so bright that it overwhelmed the images.
At this point I am not using the flash at all, but experience gives me a pretty good idea how the addition of flash will change the image. This is affected by which light modifier I have decided to use. You will acquire this experience with practice.
If your subject is stationary, you can use any shutter speed that gives you a sharp image. If you are using a tripod, that can be quite long. If you are holding the camera by hand, it will depend on the focal length of the lens you are using, the steadiness of your hand, and whether you have any kind of stabilisation built into your lens or camera body.
Now that your camera is set to full manual control, with iso, aperture and shutter speed selected, it is time to add your flash.
Adding the flash
Oops! Actually this is when we add the model (or client)
This is when the photographer really starts taking control of the final image. Decisions must be made. The photographer has to decide what kind of light s/he wants. How hard? How soft? Where will the flash be positioned? What will be it’s direction? How much does the photographer want the light to spread? And so on… This is not the place to get distracted by most of the decisions that must be made in portrait photography!
The only setting we need to concern ourselves with now is “how bright do we want the flash”? The brightness can be adjusted empirically of course. But if you have a light meter, the job becomes fast and easy. All you have to do is measure the amount of light (in F stops) at the tip of the model’s nose, and adjust the power from the flash until you get the F stop you want.
This will usually be the F stop to which you have set your camera, or slightly brighter. Remember that we have adjusted the ambient exposure to give a slightly dark room (see images 2 to 4). But there is no “right” or “wrong” here. This is one of the decisions a photographer makes according to the end result that is desired, and you are free to make adjustments along the way if you are surprised by the results you get.
Using these images as examples
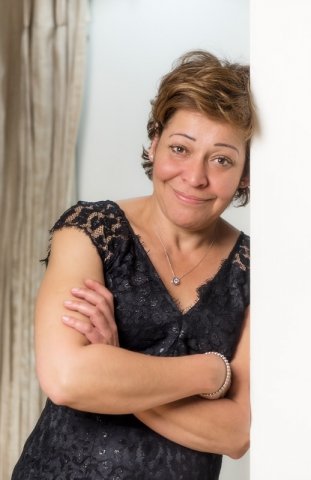
I wanted a fairly “soft” look for my photo of the model leaning against the white pillar (image 1). I did not want much contrast, and I wanted only a gradual transition of brightness across my model’s face. A photographer might choose this approach if s/he wants to minimise the signs of ageing on a lady’s face, for example. In this example, I set the flash to give just one stop brighter than ambient at the model’s nose. For this image I used a 36″ DMLS modifier from Damian McGillicuddy, fitted with the “vertical slit” front diffuser. You can guage the position of the light relative to the model’s face by the shadows on her face, and the position of the highlight in her eye. I would have raised the light source higher, but I was prevented by a low ceiling in this room. In fact there is significant bouncing of the flash off the ceiling, which contributes to the relatively even spread of light across our model.
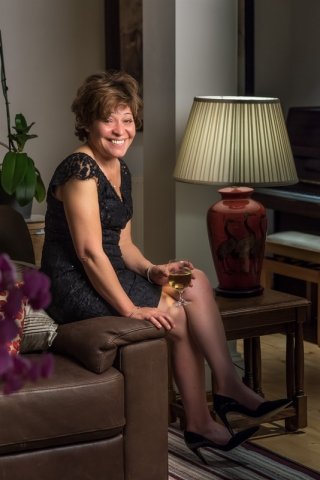
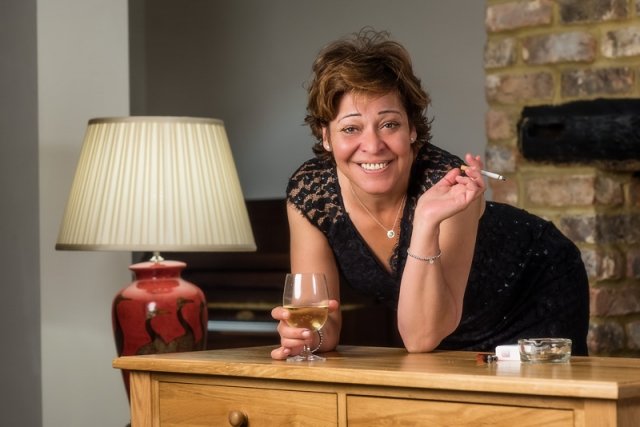
In the other three images (images 2-4), I wanted the room to be a bit darker than the model. This is because I wanted the photos to be about her, rather than the room, and I wanted it to obvious that the standard lamp is on. So I used a smaller softbox; the 19″ DMLS modifier from Damian McGillicuddy, fitted with the front diffuser. It was actually quite fiddly getting the lighting just right, so the model is nicely lit, and the standard lamp is obviously turned on. In a situation like this I would have been grateful for a small softbox with a grid. Another option would have been to add a gobo, to further restrict the spread of light, but this wasn’t necessary.
For images 2-4, the flash is giving F4 at the model’s face, and this is approximately 2 stops brighter than ambient light at the models face (obviously the amount of ambient light varies in different regions of the room).
Once you have set up your flash to give the correct amount of light on your model’s face, you can easily adjust the overall effect by changing the shutter speed. This will make the background darker or lighter, at your “artistic whim”. Just to be clear – changing the shutter speed will NOT affect the exposure due to the flash, but it WILL have a significant affect over the background.
Matching the colour of flash to household tungsten light bulbs
Speedlights have a colour temperature (white balance) that is similar to daylight, while tungsten bulbs are very yellow by comparison (especially as “seen” by a camera). Therefore one needs to make the light from the speedlight more “yellow”. This is easily achieved by fitting a CTO (colour temperature orange) filter (or “gel”) over the flash head. Many speedlights come with a rudimentary set of coloured gels, and if they don’t, coloured gels can be bought.
Technical photographic information
All four of these photos were created usinga single off-camera flash (speedlight) to supplement the ambient light in the room, which was provided by standard household (tungsten) bulbs.
These are the light modifiers I used. Unfortunately they are no longer being sold, although Lesley McGillicuddy told me that Elinchrom may start selling the 19″ modifier at some point in the future.
19 inch DMLS modifier designed by Damian McGillicuddy (I recommend this link if you are want to learn more about using off-camera flash on location, and using coloured gels over the flash).
36 inch DMLS modifier designed by Damian McGillicuddy
Useful links
An instructive article by Damian McGillicuddy, in which he describes using his 19 inch DMLS light modifier, and also coloured gels on speedlights.
An article about using CTO gels, written by Jared Platt.
Would you like to hire me for a professional photo shoot?
Then please visit the “booking a professional photo shoot” page on my website.
